GIT
Table of Contents
References:
- VS Code
- GitLab
- GitLab Extension for VS Code
- Git
- Professional Git by Brent Laster (available online in University Library)
- Git Book V2
- EBC-Tutorials
- Semantic Versioning 2.0.0
- Semantic Versioning Wikipedia
Introduction
A version control system allows you to keep track of changes made to code over time. This means that you can, at any given point, revert to older versions of the code you are working on.
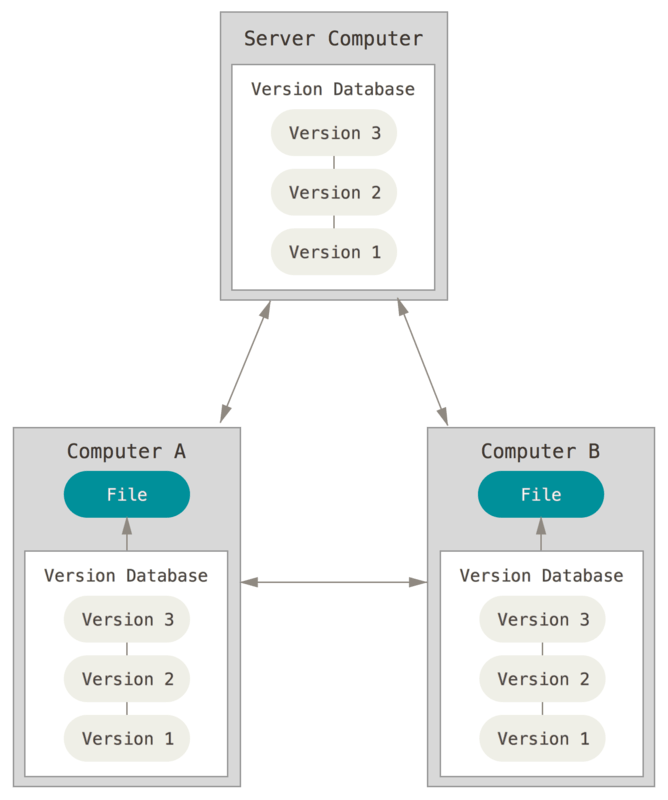
Git is a popular version control software that operates on a Distributed Version Control System (DVCS). This system provides every user with a copy of all files, allowing them to edit locally. Users can work on files locally and then upload them to the server. The advantage of DVCS is that if a server crashes, a local user can upload the files and restore the server since they have a complete copy of the server data.
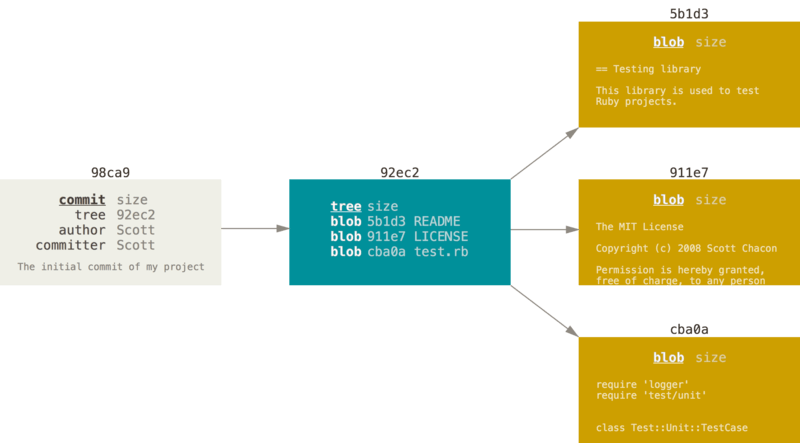
Git stores content in the form of trees and blobs. A blob (Binary Large Object) is an object type used to store file content without metadata like the creation date of the file. A computed checksum (SHA-1) represents the file. A tree holds listings of other trees and blobs. A commit takes a snapshot of the tree at a specific moment and saves it. When you create another commit, a new snapshot is taken with only the required changes in the new commit. The old/unchanged files remain the same, and the new commit points to the old files. Thus, storage is required only for changed files.
Workflow
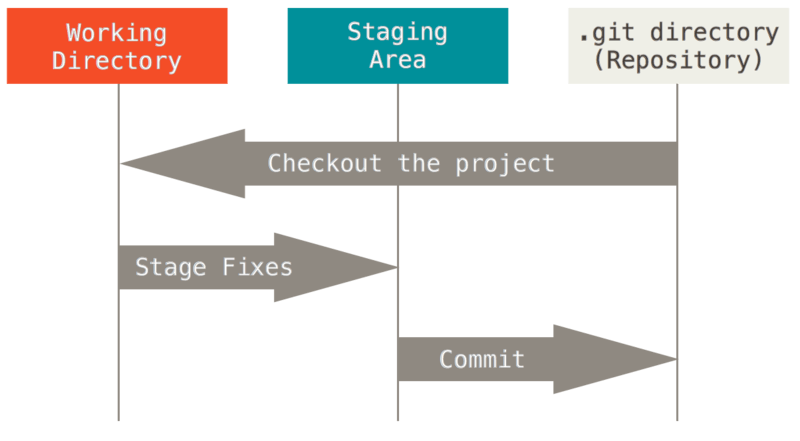
In Git, you have the Working Directory, Staging Area (index), .git Directory (local repository), Upstream Directory (remote repository), and Stash.
Elementary Git Workflow
- You modify a file in your Working Directory.
- You mark the edited files as confirmed changes and stage them. This saves only the changes as a snapshot. The original file is stored as a reference.
- You commit those files. This takes the staged files and stores the snapshot of changes permanently in your Git repository.
- You push your changes from the local repository to the remote repository.
Small Teams
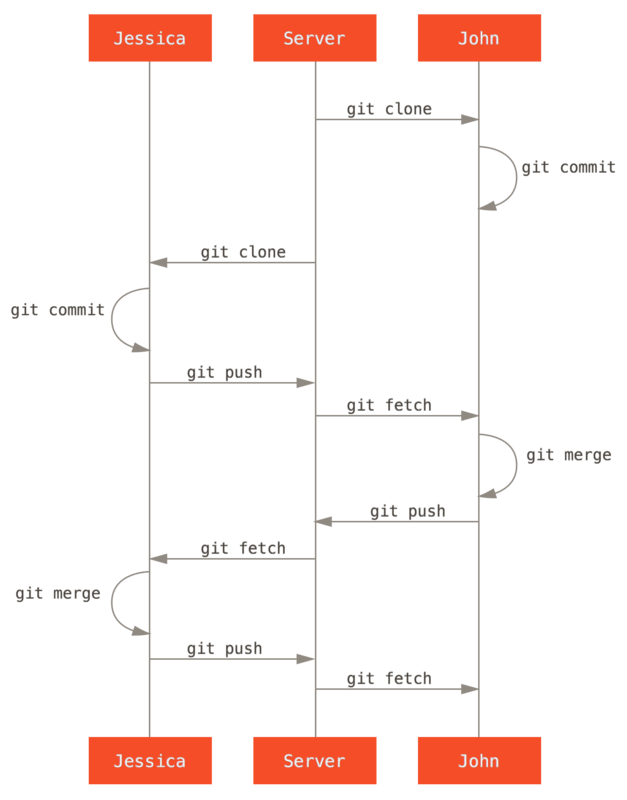
When working in a small team, say with 2 members, your workflow will be as follows:
- Creation of a new repository either online or locally on a PC.
- Clone the repository if created online. Push the repository to the server if created offline.
- Create the required branch (e.g., feature).
- Code and test it.
- Commit the code.
- Repeat steps 4 and 5 until a certain part of the feature is ready.
- Push to the remote repository.
- Repeat steps 4 to 7 until the feature is completed.
- Merge the feature branch into the main branch.
Contributing to Online Projects
When contributing to online repositories, the following activities are typically performed:
- Fork the project to your account.
- Create a topic branch from the master.
- Make some commits to improve the project.
- Push the code to your account’s project.
- Open a Pull Request on the platform (e.g., GitLab).
- Discuss with the project’s team and optionally continue committing.
- The project owner merges or closes the Pull Request.
- Sync the updated master back to your forked project.
Commits
When you make a commit, Git stores a commit object that contains a pointer to the snapshot of the content you staged. This object also contains the author's name and email address, the message you typed, and pointers to the commit or commits that directly preceded this commit (its parent or parents): zero parents for the initial commit, one parent for a normal commit, and multiple parents for a commit that results from a merge of two or more branches.
There is no strict rule for commits, but it is suggested to have one commit per task or bug.
Commit messages are important as they provide information about what you edited in that specific commit. Thus, when you review your changes history, you can recall what you did by reading the message, or when a third person is going through your work, they can make sense of your changes if they plan to work on your repository. The suggested length of the text is 50 characters. Provide concise information in this.
For example, if you change a function in code:
Fixing file in code// Not goodFix function ###// GoodFix function ### in file ###// Better
Files that are not required to be tracked can be ignored during commit using the .gitignore file (usually found at the root directory). Typical untracked files may include build files or temporary files. To untrack a file, simply add the relative location of the file/folder to the .gitignore file.
If you forgot some files in the last commit or want to update your commit message, you can add the files to the staged area and then use the amend command. You must do this before you push to the remote repository.
Git Branches
Branches are used to create a separate directory of your code and then work on that copy. This allows you to create a copy from your main working branch with all the history of changes in it. You can then work on the new branch to fix a bug or implement a new feature. Once done, you can merge the branch into your main branch.
This helps avoid editing files in a working environment. For example, you have a blink LED program that starts automatically when the board boots up. You need to implement a button trigger to start this blink. So, you create a new branch from your main branch and then implement and test your code. When everything works, you combine the changes from the new branch to the main branch.
You can also work on multiple branches simultaneously and fix a bug while working on a new feature. Just ensure that when merging your new features, you incorporate the bugs fixed on the main branch during the development of the new branch.
Merging and Merge Conflicts
To incorporate a new branch into the main branch, you use the merge command. This copies the required code from the source branch to the target branch. The source branch can then be deleted if necessary.
In a situation where two people, A and B, are working on the same project. A updates the README.md file and pushes the changes. B also adds content to README.md and tries to push the changes but gets a conflict error because B did not pull A’s updated version of README.md before pushing.
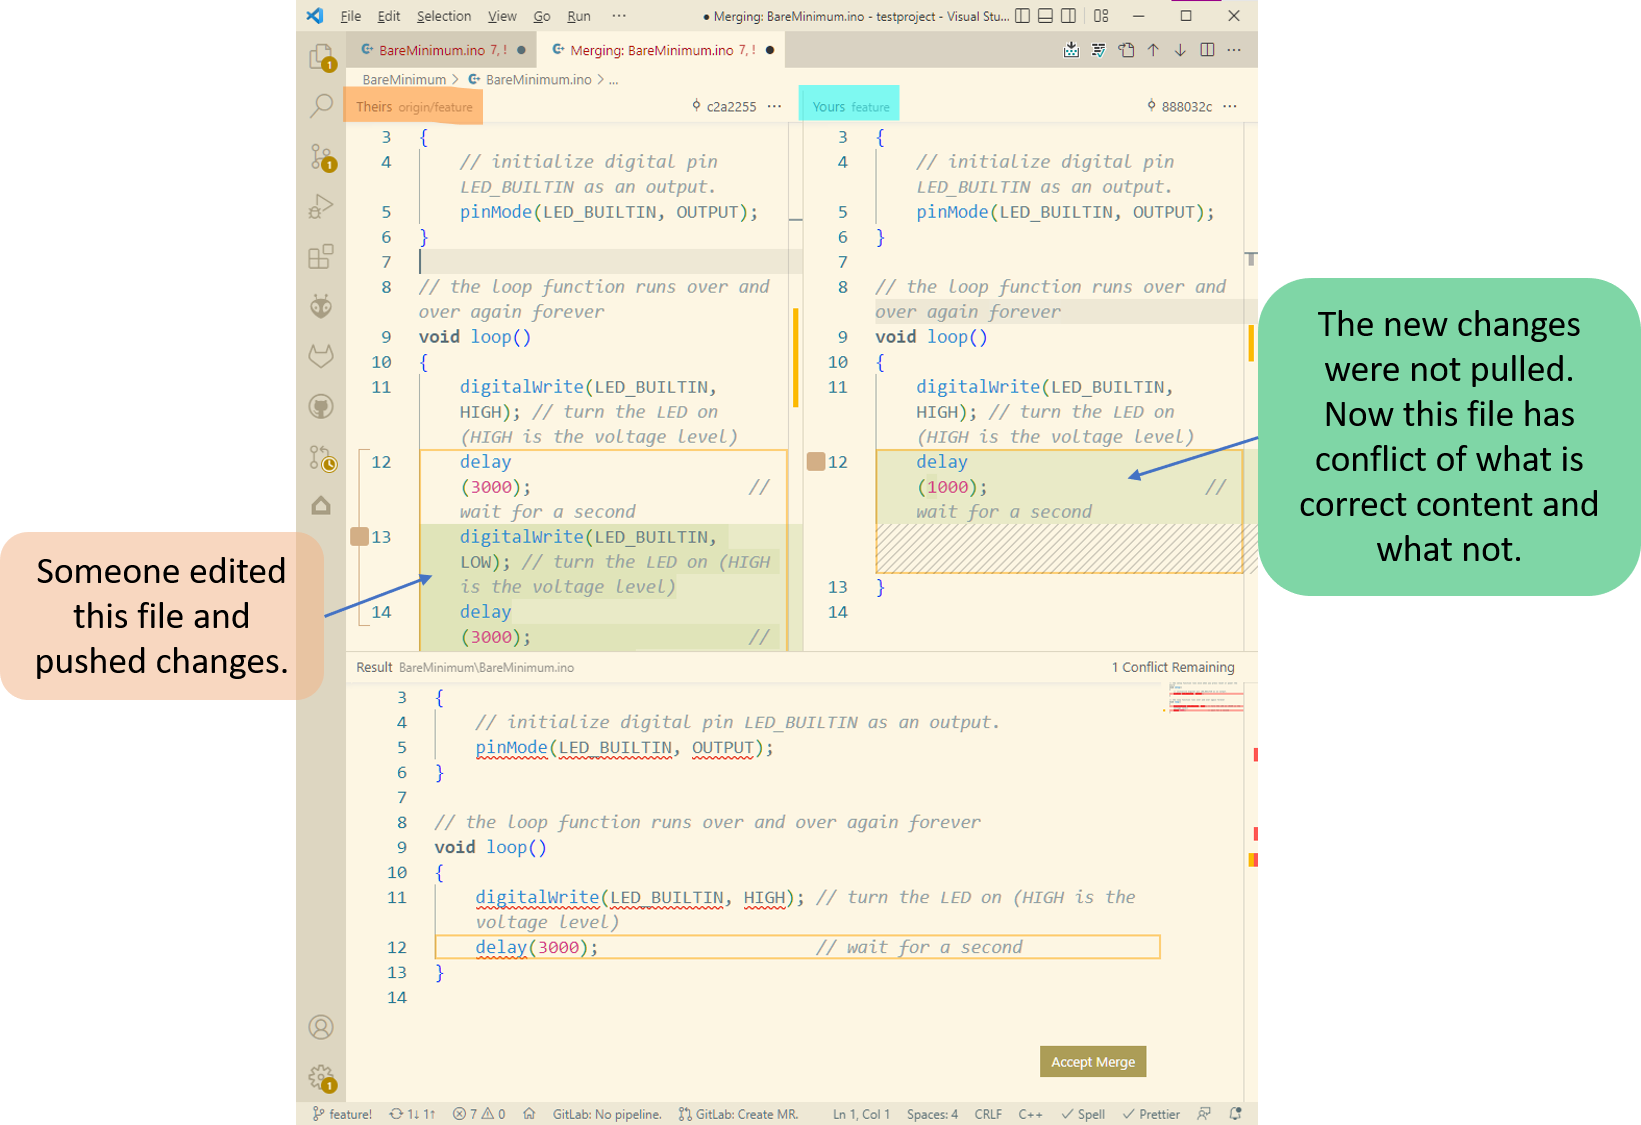
To avoid such conflicts:
- Always pull before pushing.
- Do not have more than one developer working on a specific file.
- Try merging the main branch frequently into your feature branch to keep new changes updated in your feature branch.
Tags
To mark a specific milestone for the project, tags are used. Tags are initially saved on the local repository and have to be pushed to the remote repository.
There are two types of tags:
- Lightweight: It points to a specific commit.
- Annotated: It stores the data as a full object in the Git database. It contains the tagger's name, email, and date.
The tag type depends on what information you want to save. If it's a temporary tag, a lightweight tag is a better option.
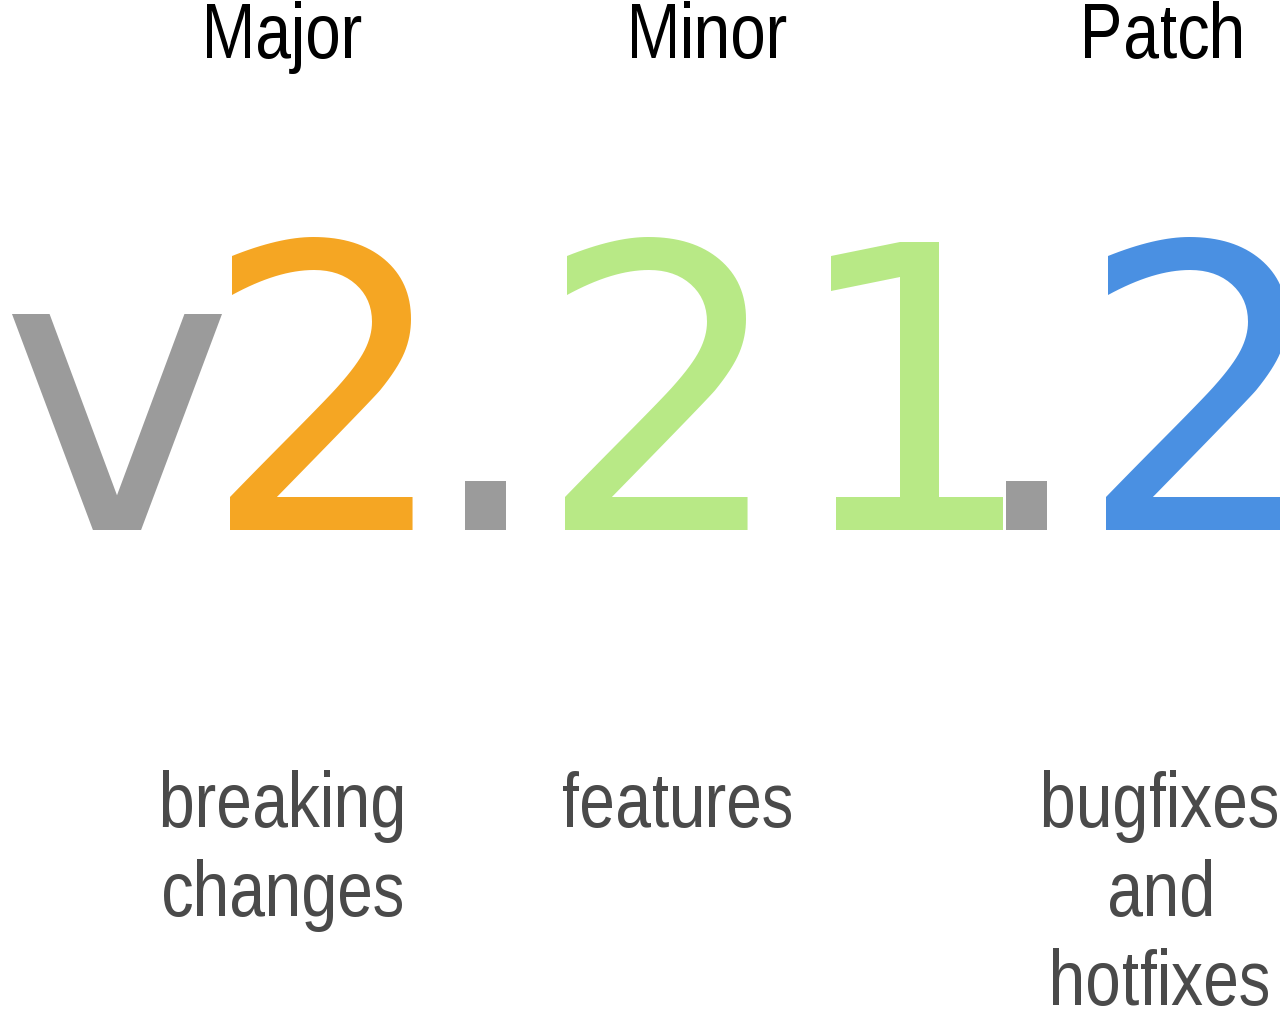
You can use semantic versioning for creating tags. Find more information here.
Rebase
Rebasing allows you to move commits and their history to another branch. This means you are changing the base of your branch and making it appear as if it was created from a different commit. The main use of rebasing is to have a linear commit history.
The difference between a merge and a rebase is that in a merge, if the branch moves forward with a commit, merge will create an empty commit, which will be stored in your history.
In rebase, Git finds a common commit and saves the differences after that. Then, in sequential order, it applies the changes.
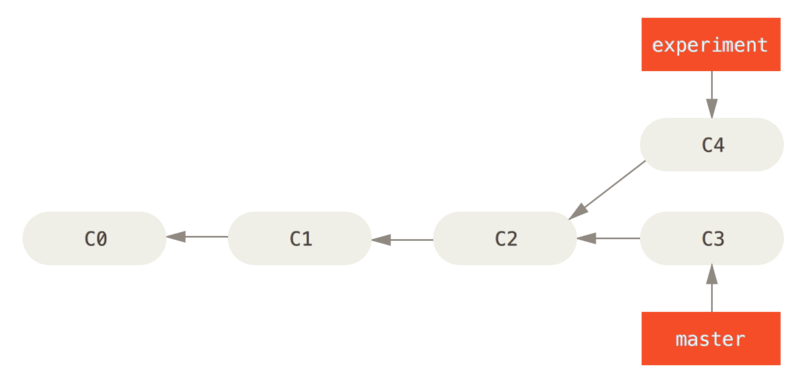
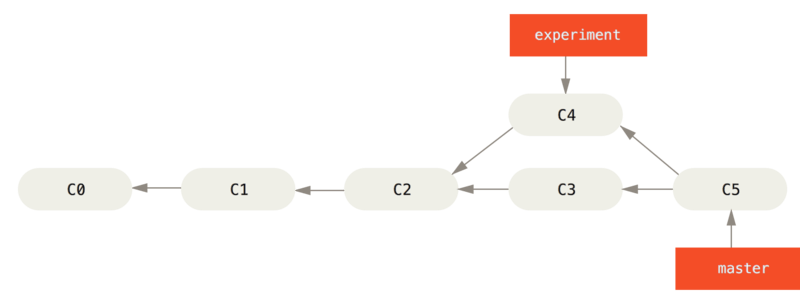


For more information about this, visit:
Git Interface
Git is officially available as a command-line tool but is also available in different environments. You can download the Git command-line tool from here. There are various GUI tools and extensions for popular IDEs and code editors available.
Initially, you need to provide some details about yourself when you first install Git. To do so, open a new terminal or command prompt.
For Windows users, enter git config --global core.editor "notepad" in it.
Enter git config --global --edit in it. A file will open in a text editor. Enter your name and email in that file after the colon (:).
Git Commands
A basic list of commands used in Git is provided below. For additional commands, please refer to the GitHub Training.
Clone New Repository
git clone -b <BRANCH_NAME> <REPOSITORY_URL_WITH_HTTPS>: To download the repository to your PC as a local repository.
Basic Workflow
git status: This provides you with the current status of your repository, such as information about modified files, the last commit, and branch information.git add PATH_TO_FILEorgit add .: It adds the files to the staging area. The dot (.) adds all changed files inside your working directory to your staging area.git commit -m "commit message": It moves the files from the staging area to the local repository. The-mis a required flag used to provide a sensible commit message to name the changes you made.git push: Publishes the changes from the local repository to the remote repository.
Make New Branch from Main
git checkout main: To set the main branch as the default working branch.git pull: To download changes from the main branch.git branch NEW_BRANCH: Create a new branch.git checkout NEW_BRANCH: SelectNEW_BRANCHas the default working branch.git push --set-upstream origin NEW_BRANCH: To setNEW_BRANCHas the default when uploading to the remote repository.
Tags
git tag: List current tags.git tag -a [Name_for_Tag] [Commit_Hash_ID]: Add a tag with a specific name for a specific commit.git push --tags: To push tags to the remote repository.git push --follow-tags: Push only annotated tags to the remote repository.git show [TAG_Name]: Display details of a tag.git tag -d [Name_for_Tag]: To delete a specific tag. To remove it from the remote repository, usegit push origin :[Name_for_Tag].
Amend
git commit --amend: Adds the files to your last commit.
Log
git log: To see the complete history of Git commits.q/z: To exit the log.
Tasks
The tasks below are designed to teach Version Control with VS Code and GitLab.
Hint: You can follow these tasks directly with Git commands in CMD/Terminal.
Task 1
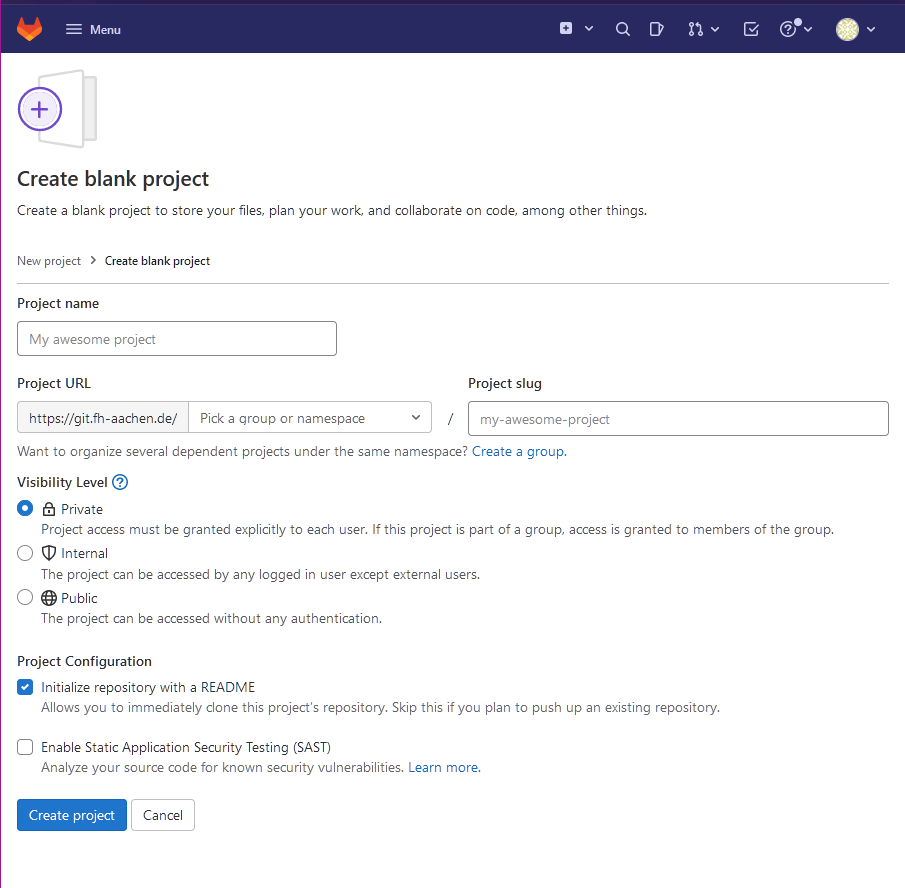
Creating a new repository on the GitLab website.
Follow the steps below:
- Open the GitLab website and log in. You will see a page with all the projects in your account.
- Click on the New project button to create a new project. On the next page, click on Create blank project.
- On the next page, enter the name of your project.
- In the project URL, select your FH-Kennung number (FH identifier) (e.g., AB1234S). In the Project slug, enter the name of the project. Please avoid spaces or dots.
- For Visibility level, select Private.
- Select Initialize repository with a README and click on Create project.
Task 2
Managing a project in VS Code.
Follow the steps below:
- Have a ready setup of VS Code with a connected GitLab account.
- From the Get Started page on VS Code, click on Clone Git Repository. You can also clone a repository using Command Palette -> Git: Clone.
- Click Clone from GitLab -> Select the created repository from the list. Then select the link with HTTPS.
- Select a folder to save the files on your PC. Prefer saving them in the Documents folder. Then click Select Repository Location.
- Once cloned, VS Code will ask whether to open the recently cloned repository in the current window or a new window. Select Open.
Task 3
Managing branches and publishing a branch.
Follow the steps below:
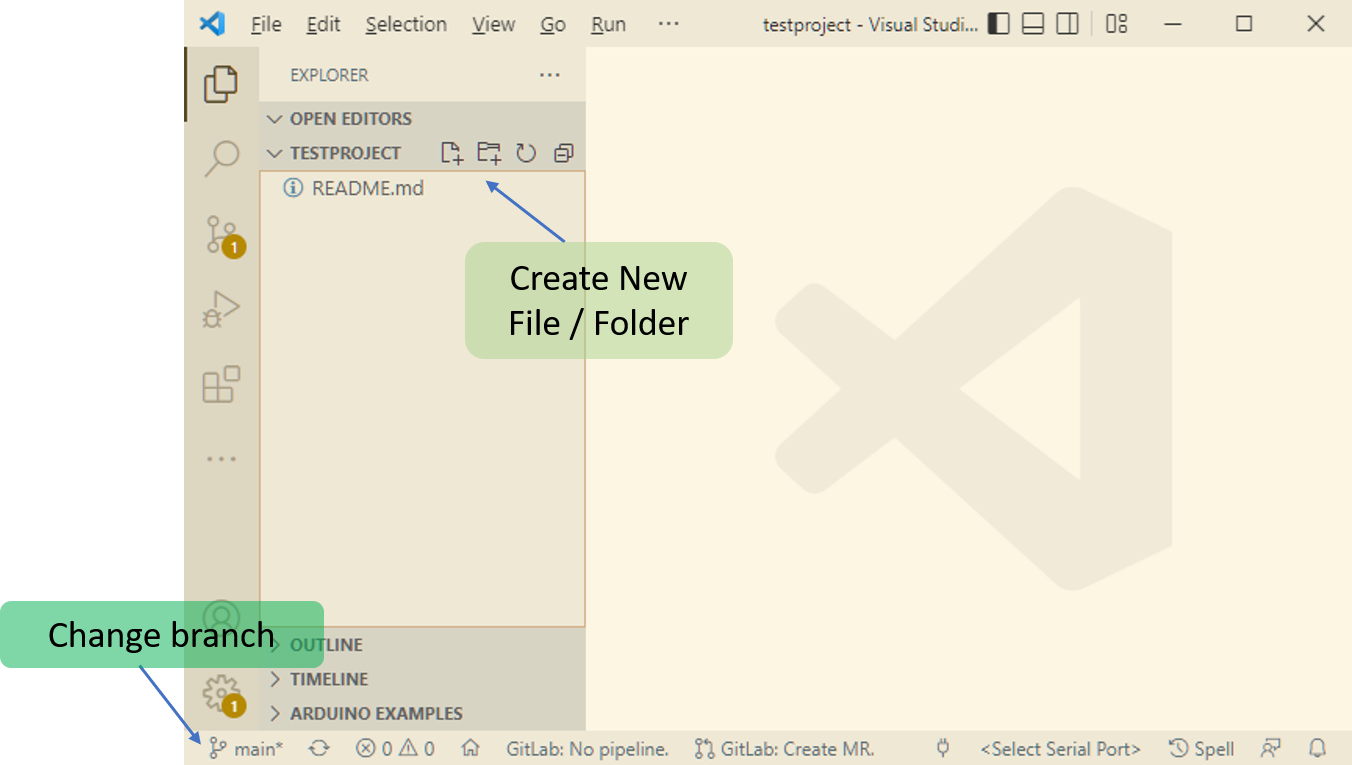
- Create a new branch by clicking on the bottom left option (initially you will see Main written).
- Select Create new branch. Enter the name of the new branch as "develop".
- Add a new folder to the project by clicking on New Folder from the Explorer on the left side. Name the folder Blink.
- Create a new file inside the folder named Blink.ino. The extension is important.
- Paste the following code into the file:
// the setup function runs once when you press reset or power the board
void setup() {
  // initialize digital pin LED_BUILTIN as an output.
  pinMode(LED_BUILTIN, OUTPUT);
}

// the loop function runs over and over again forever
void loop() {
  digitalWrite(LED_BUILTIN, HIGH);   // turn the LED on (HIGH is the voltage level)
  delay(1000);                       // wait for a second
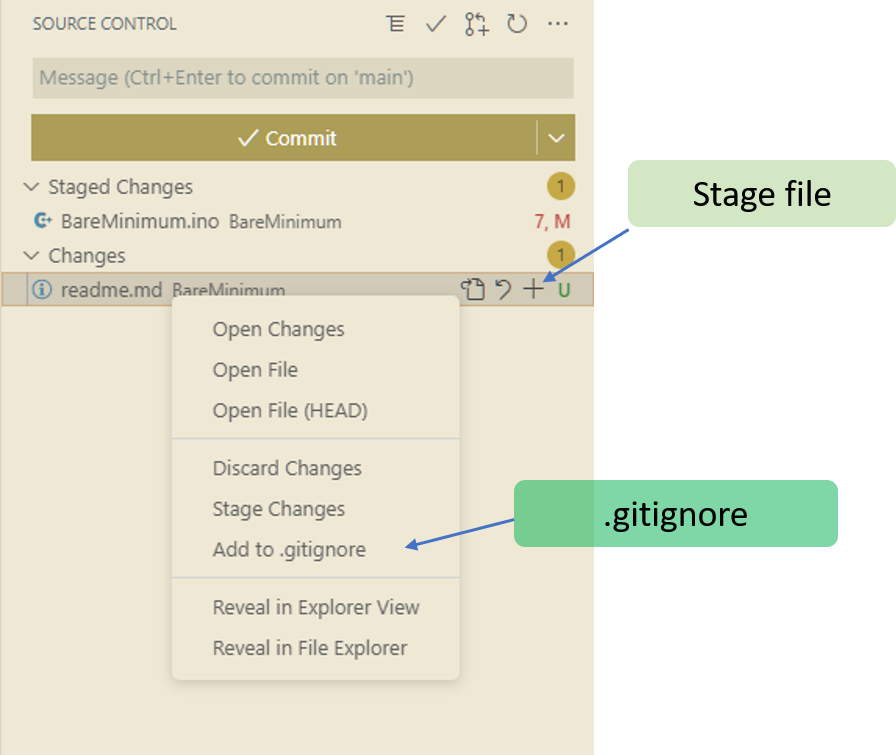
}- Click on Source Control from the left panel. Enter a commit message "initial commit".
- Click on the Commit button. Next, click on Publish Branch.
You can stage the required files for commit by using the plus (+) sign next to the files. When the commit button is pressed, only the staged files are committed. The files which are not required can be added to .gitignore by right-clicking on the required file.
Task 4
Updating files online using the GitLab website.
Follow the steps below:
- Open your project online on GitLab.
- Switch the branch of the project to "develop".
- Locate the file Blink.ino.
- Click on Open in web IDE.
- Add the following lines in the code between
delay(1000);and}:
digitalWrite(LED_BUILTIN, LOW);    // turn the LED off by making the voltage LOW
delay(1000); // wait for a second- Once done, click on Create commit from the left side.
- Enter a commit message "update LED blink". De-select Start a new merge request.
- Click on the Commit button.
When you update code online, this means that the code on your PC is old. To get the latest version of the code, you must PULL the changes. This is done in the next task.
For more information, please read the Workflow section of the tutorial.
Task 5
Pulling and pushing files from VS Code.
Follow the steps below:
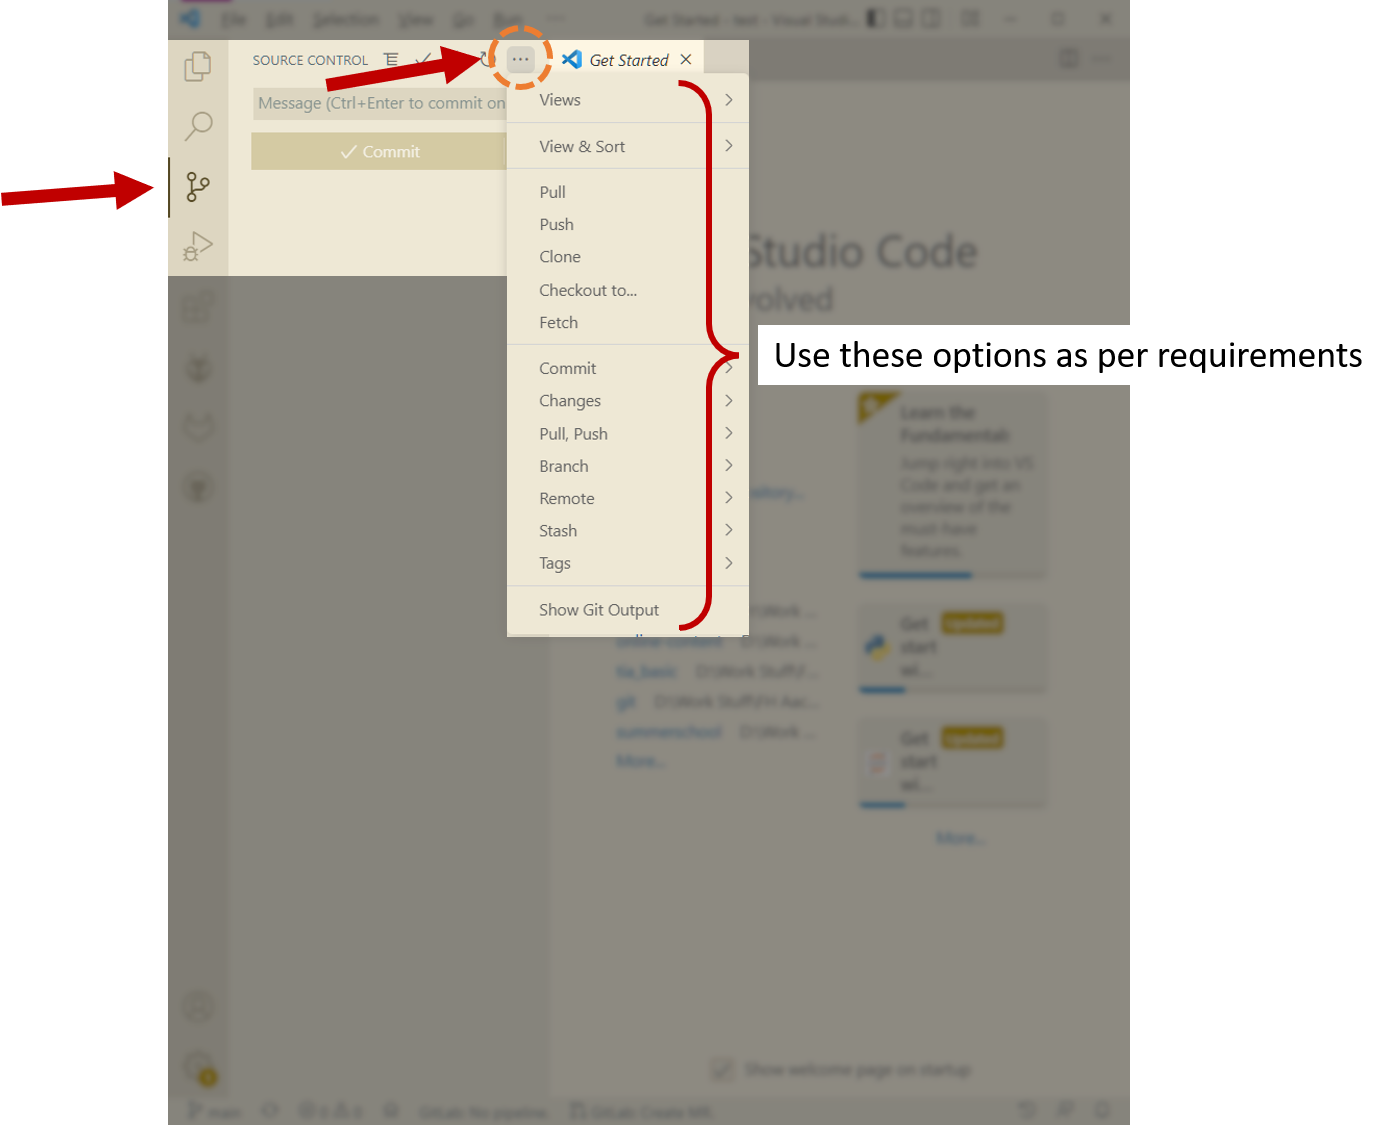
- In VS Code, go to Source Control.
- Click on the Source Control menu (⋯) icon. In that, click on Pull. This will download the changes made from the GitLab server.
- Open the file Blink.ino.
- Replace the delay time from
1000to2000for both delay functions. - Save the file and go to Source Control.
- Enter a commit message, "Updated Blink duration".
- Click on the Source Control menu (⋯) icon. In that, click on Push. This will upload the changes to the GitLab server.
Task 6
Merging "develop" to "main" branch.
Follow the steps below:
- Open your project online on GitLab.
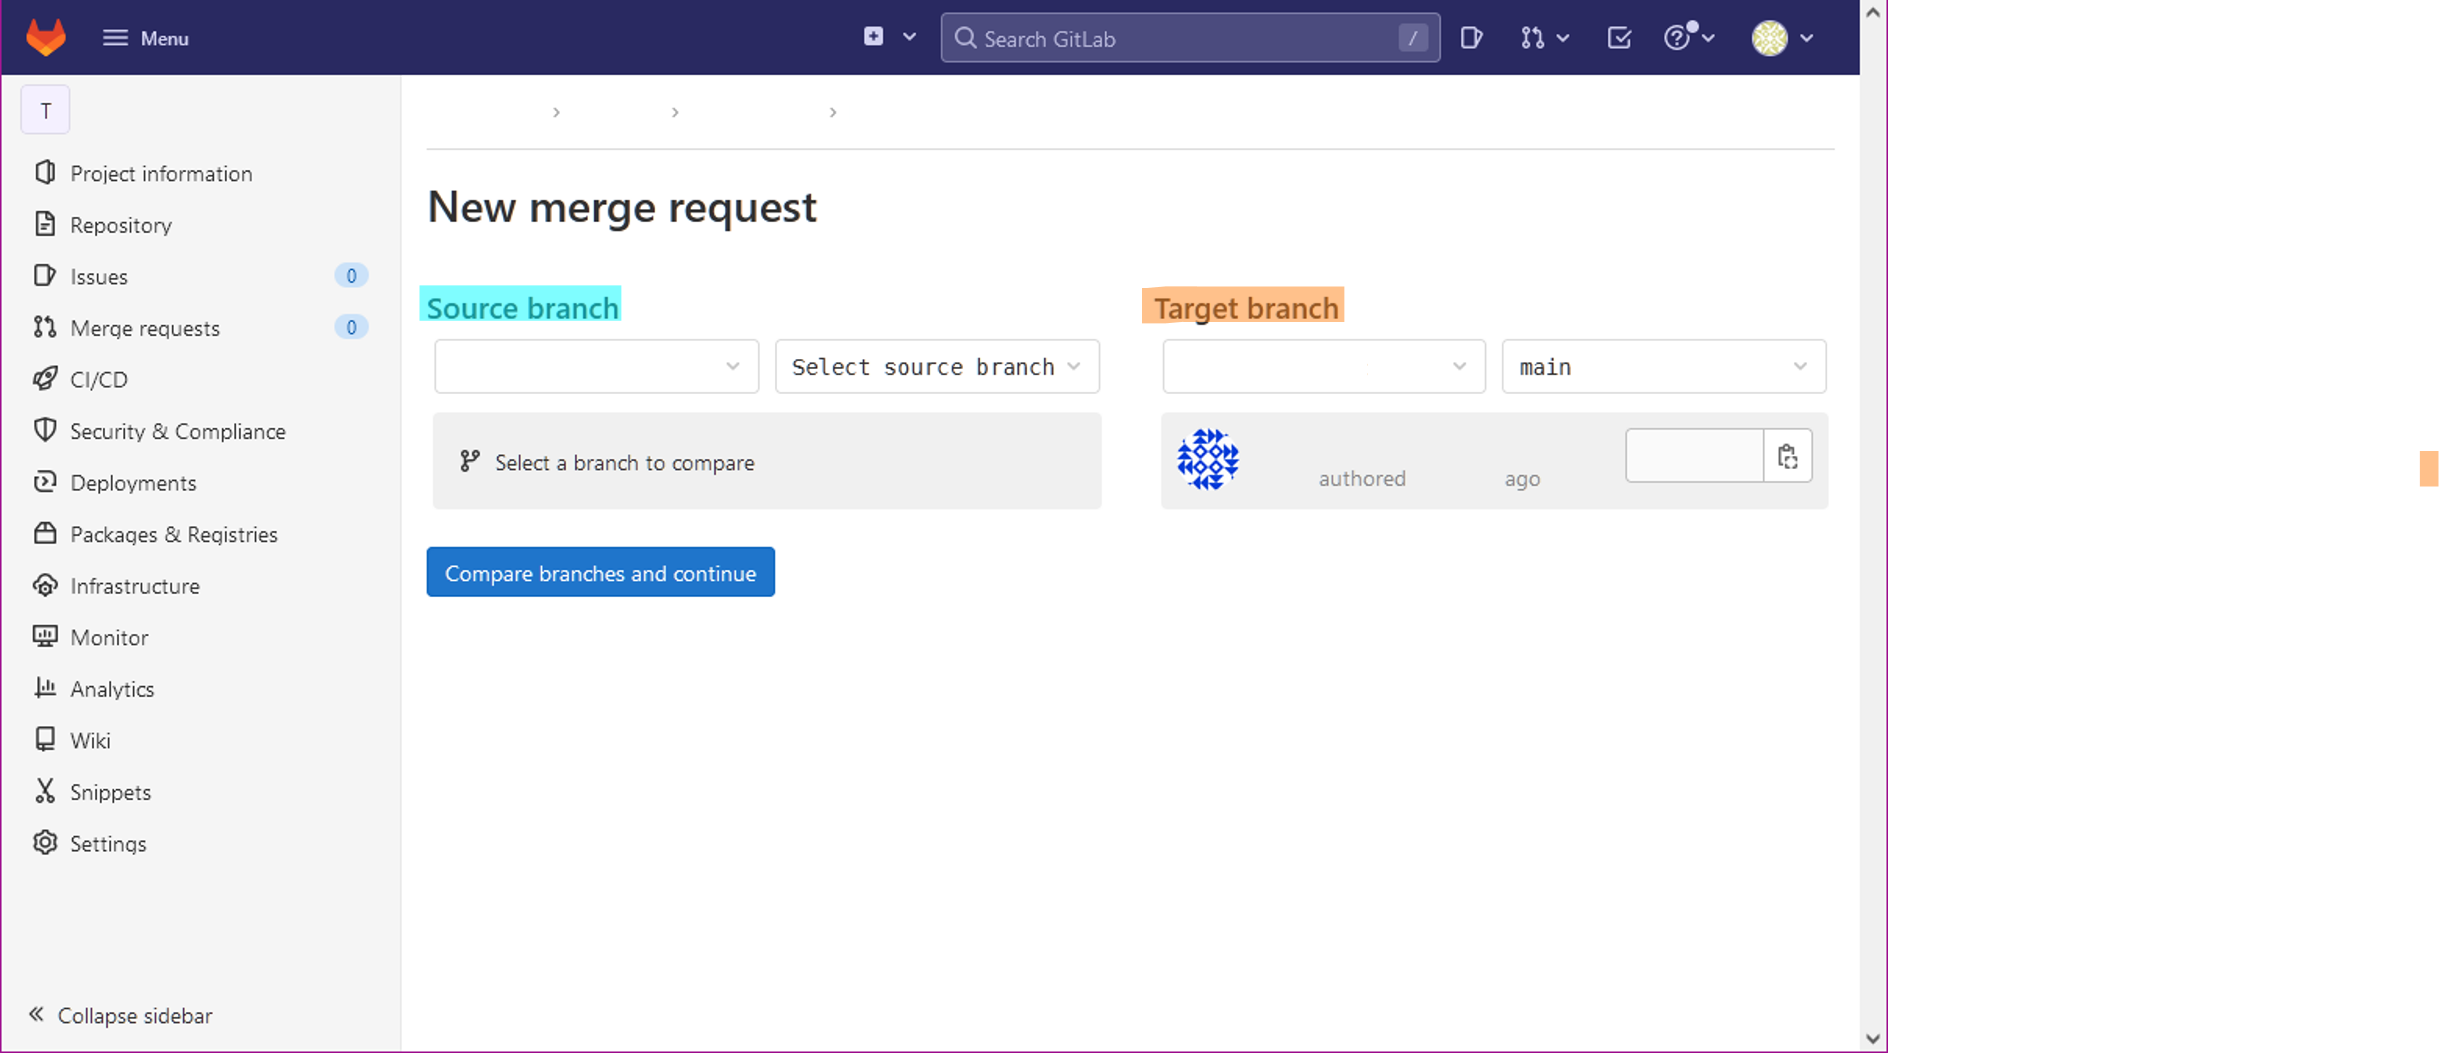
- From the left side menu, click on Merge requests. On the new page, click on New merge request.
- On the next page, select the source branch, "develop", and in the target branch, select "main".
- Next, click on Compare branches and continue. Enter the title for the merge request.
- In the Description, provide brief information about the content of the new feature/part completed with this branch.
- Change the rest of the options as per requirement.
- Once everything is ready, click on Create merge request.
- After this, another page will show up. This will show the details about the merge request. If everything is correct, it will show Ready to merge!.
- Click on Merge to combine the code into the main branch. After this, the changes will be moved to the main branch.
- Open the repository’s main page. Confirm whether the code is merged properly or not.
Task 7
Create an annotated tag for this version of the code.
Follow the steps below:
- In VS Code, go to Source Control.
- Click on the Source Control menu (⋯) icon. In that, click on Tag. Click on Create Tag.
- Enter the required information such as Tag name and annotation message.
- Click on View -> Command Palette.
- Enter Git: Push Tags.
